Unity Space Shooter – Chapter 10 – asteroid collision

Asteroid continued  – Now add pretty explosions including the fatal player collision.

Expand on the collision script…

To make it blow up by spawning an explosion

Using tag to identify Player,  and have it blow up


Then reuse the Movement code by dragging and dropping it onto the Asteroid. then setting speed in negative direction.

Unity Space Shooter – Chapter 9 – Asteroid prefab(rotation)

Create Opponent

  1. Setup a template asteroid object (chapter 8)
  2. Save it as a Prefab (chapter 9)
  3. Expand programming so it happens in groups


Part 1

Create Placeholder Game Object called Asteroid(reset transforms, change z above player object so we can see them relative to each other)

Drag and drop the model for an asteroid into it(reset transforms)

[ This continues the pattern of Parent object holds the program, child is what to render.]

Back at “Asteroid” Add rigidbody(no gravity, no angular drag) , Capsule collider and scale it.

Back at “asteroid” add a new c# program with “start” routine so we can set a random tumble for the object when it starts

That takes care of start. But what about hit?  New Object for that that has a collider trigger like the boundary(but enter not exit variety)

So on the same “asteroid” object, create another c# script called DestroyByContact

Debug.Log(other.name);


Unity Space Shooter – Chapter 8 – boundary collider

Create a boundary around the game play area so the shots can be removed from play after they fall off the field.


  1. Create a box larger than the play area
    1. Create Cube
    2. Scale it
    3. Make sure it has a box collider
    4. isTrigger is checked
    5. Remove the Cube(mesh filter)
    6. Remove the mesh renderer.
  2. Create script(to handle the trigger) DestroyByBoundary
  3. Edit and add the OnTriggerExit routine.  When triggered, it will destroy the other object.
  4. Easy

Unity Space Shooter – Chapter 7 – fire laser shot from player

Shooting shots.

Create an game object called “shotSpawn” as a child of our player.  This will become the origin for the shot when started, but we need a way to communicate between the object and the c# program, so we make a couple helpers

Edit “PlayerController”

Object:

Positon:

Rotation:

We need a way to fill those in.

In the c#

public GameObject shot; // what gets shot

public Transform shotSpawn; // the object to use to get the shot

In Unity

Make an empty game object called ShotSpawn as a child of the Player object. Adjust it to the tip of the nose.  This is where the initial location comes from.

Drag the bullet from the Prefabs into the new “shot” reference

Drag the ShotSpawn into the new shotSpawn reference


That is the setup.


Now to shoot.

Instantiate the shot when button is clicked (but include a pause) so we dont fire one every frame


Unity Space Shooter – Chapter 6 – create laser prefab

Shot fire Object

A lot going on.

We create a game object called “Bolt” and add a child object(quad) called VFX.  We make this two parts so we can separate the logic from rendering.

  1.  Game Object  called “Bolt” This will be our primary shot object. The bolt object has movement(rigid body) and collision detection(capsule collider)
  2. Child Game object called VFX(quad) (transform rotate 90 to see)
  3. Create a material
    1. Go to material folder
    2. Create new new material and name it fx_bolt_orange
    3. Use the “select” picker to attach the texture of the bolt
    4. Select shading as mobile/particles/additive
  4. Drag and drop new material onto Quad
  5. Setup collision
    1. Remove “mesh collider” from VFX object(there by default)
    2. Go to Bolt and add component physics/capsule collider
      1. Adjust the size
      2. Change Direction to z-axis
    3. Select “isTrigger” checkbox to make it a “trigger collider”
    4. Attach a new Script called “Mover”

    5. see the new public “speed” set that on the Bolt object(20 is ok)
    6.  Test by playing.
    7. Move it to Prefab
    8. Test by playing and drag and drop as often as you want.


Create new Material

fx_bolt_orange


REMEMBER * * *  CHANGES TO OBJECT PARAMETERS ARE NOT SAVED UNTIL YOU ARE OUT OF TEST-GAME MODE * * *


Yup. Working through the tuts.

Chapter 4.

Background:
Add 3d/quad

  1. Reset origin
  2. Rename it.
  3. Create the mesh renderer(background) texture, by dragging-and-dropping from the textures folder.
  4. Scale it to 15 x 30
  5. Cuts off the bottom of the player.  So set y to -10

  6. It looks all shiny, so we remove the light by going to mesh-renderer, shade: unit/texture

Chaper 5 – move the player using keyboard

Features: c#, and FixedUpdate()

  1. Select The object
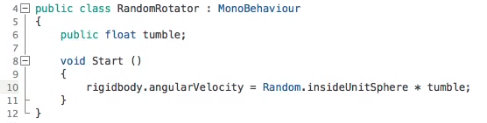
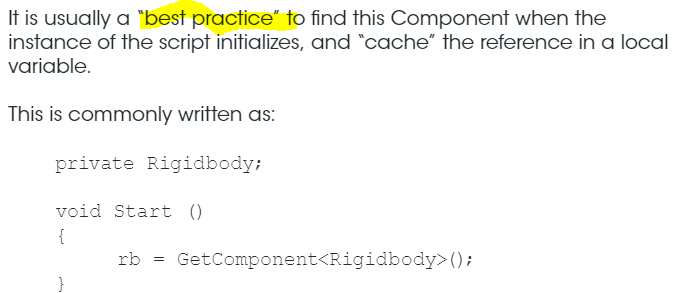
  2. Add component – new script and call it PlayerController Best to start visual studio before trying the editor, else the thing get stuck with a “launching” button.(might be why stuff didn’t save when I left too.(?))

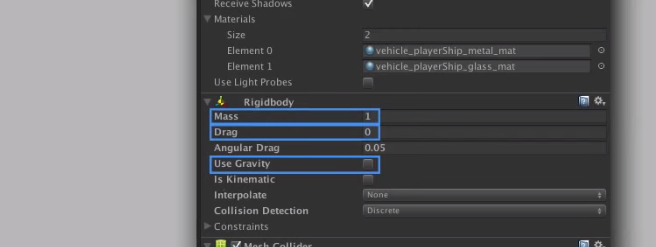
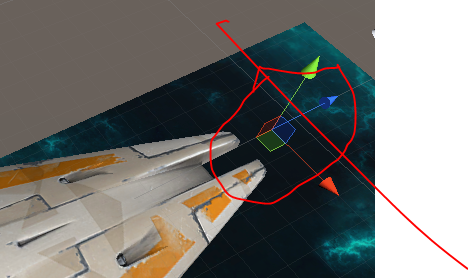
  3. We are using  the physics engine so these things are important

  4.  Note – this is what they say to use

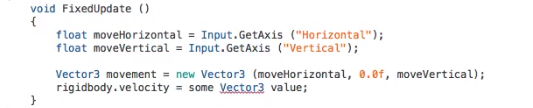
I like how they build the variable starting with the prototype then fill each parameter in as they translate them

Then they translate them one by one.  Here we have no Y , so that is 0.  The rest is process of elimination.

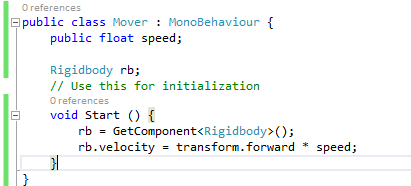
Studio complains because 5  doesnt have rigidbody.  Lets do this per the upgrade pdf.


We adjust our script accordingly.


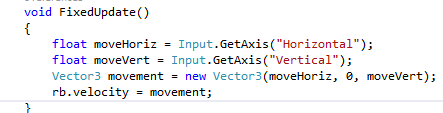
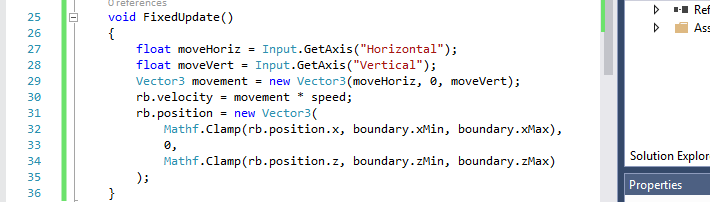
Make it more responsive by using a public speed variable (and set to 13)

public float speed = 13;

rb.velocity = movement * speed;


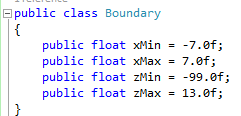
Limit movement using Clamp function in the FixedUpdate routine.


Unity SpaceShooter – Chapter 4 – move player with keys