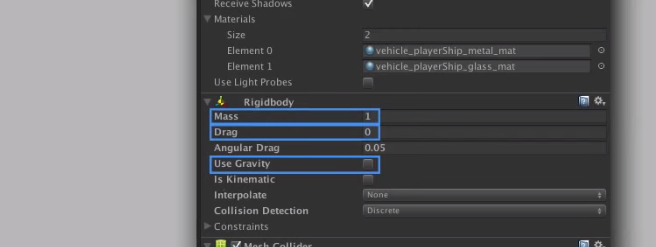
REMEMBER * * *  CHANGES TO OBJECT PARAMETERS ARE NOT SAVED UNTIL YOU ARE OUT OF TEST-GAME MODE * * *


Yup. Working through the tuts.

Chapter 4.

Background:
Add 3d/quad

  1. Reset origin
  2. Rename it.
  3. Create the mesh renderer(background) texture, by dragging-and-dropping from the textures folder.
  4. Scale it to 15 x 30
  5. Cuts off the bottom of the player.  So set y to -10

  6. It looks all shiny, so we remove the light by going to mesh-renderer, shade: unit/texture

Chaper 5 – move the player using keyboard

Features: c#, and FixedUpdate()

  1. Select The object
  2. Add component – new script and call it PlayerController Best to start visual studio before trying the editor, else the thing get stuck with a “launching” button.(might be why stuff didn’t save when I left too.(?))

  3. We are using  the physics engine so these things are important

  4.  Note – this is what they say to use

I like how they build the variable starting with the prototype then fill each parameter in as they translate them

Then they translate them one by one.  Here we have no Y , so that is 0.  The rest is process of elimination.

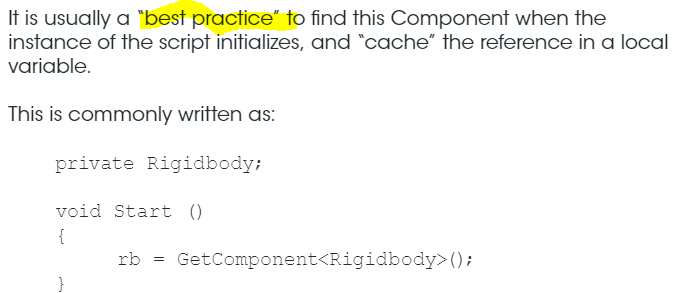
Studio complains because 5  doesnt have rigidbody.  Lets do this per the upgrade pdf.


We adjust our script accordingly.


Make it more responsive by using a public speed variable (and set to 13)

public float speed = 13;

rb.velocity = movement * speed;


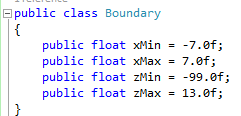
Limit movement using Clamp function in the FixedUpdate routine.


Unity SpaceShooter – Chapter 4 – move player with keys

Useful WPF sites

Localization using WPF and resx
http://toadcode.blogspot.com/2008/04/wpf-localization-resx-option.html
[Remember to make your .resx file type public, not internal]
Also – popup dialogs have must be changed back to original or the get file not found errors

Thread.CurrentThread.CurrentUICulture = new System.Globalization.CultureInfo("en-US");

Might be good too…
http://jeremybytes.blogspot.com/2013/07/changing-culture-in-wpf.html

Window – Page

Baby step 1 – getting around – links and such

Recipe:
1. Controller – add ActionResult to existing controller(HomeController)
2. View – add the Raisor CSHtml

1. Controller – add ActionResult to existing controller: /home/Controllers/HomeController.cs

namespace MVC_Richtest.Controllers
{
public class HomeController : Controller
{
public ActionResult Index()
{
ViewBag.Message = "Welcome to ASP.NET MVC!";

return View();
}

public ActionResult About()
{
return View();
}

public ActionResult Argh()
{
return View();
}
}
}

2. Create a corresponding file in /views/Home/Argh.cshtml

@{
    ViewBag.Title = "Argh";
}

<h2>Ahoy Matey</h2>
<p>
     No doubt ye be wonderin' what this page be about. Well, argh, it is about nothin' special, see. And any scalaway sea cow's loving scourge should know better. Argh!
</p>

Log to debugger view

Step 1: define a TAG so we use log filters (can also be any string you choose)

	static public String TAG= Activity.class.getName();

Step 2: write [ d=debug, e=error, i=info, v=verbose w=warning

	Log.v(TAG, "Message here");

Button – click monitor onclick and onrelease

		Button bXMinus = (Button) findViewById(R.id.btnXMinus);
		bXMinus.setOnTouchListener(new OnTouchListener() {
		    @Override
		    public boolean onTouch(View v, MotionEvent event) {
		        if(event.getAction() == MotionEvent.ACTION_DOWN) {
		        	sendMessage("jog x -1");
		        } else if (event.getAction() == MotionEvent.ACTION_UP) {
		        	sendMessage("jog x 0");
		        }
		        return true;
		    }
		});

Android and Webview

As I found out when I was working with the canvas, graphic are clunky – well about the same as everything else. The stuff I want to do is not so pretty, it is more functional. I want nice looking dial or pretty graph of live data. Why not use the web and access the android data as a service. Good idea. This post outlines the experiments.

Basics – a simple web pages as an app.
1. Create a project with a main activity and webview as about all you see.
2. Update the manifest to include internet access? – even for local?
3. create a folder called html in the assets folder of the project
4. Fill it with a file called index.html
5. Put some stupid stuff in index.html
6. [special bonus for including css file]
7. customize mainactivity to allow javascript and open the local url

<uses-permission android:name="android.permission.INTERNET" />

Experiment 1 – My own

public class MainActivity extends Activity {

	@Override
	protected void onCreate(Bundle savedInstanceState) {
		super.onCreate(savedInstanceState);
		setContentView(R.layout.activity_main);
		
		WebView myWebView = (WebView) findViewById(R.id.webView1);
		String summary = "<html><body>You scored <b>192</b> points.</body></html>";
		 myWebView.loadData(summary, "text/html", null);
		 		//myWebView.loadUrl("http://www.example.com");	
	}

}

Experiment 2 – With the world

public class MainActivity extends Activity {

	@Override
	protected void onCreate(Bundle savedInstanceState) {
		super.onCreate(savedInstanceState);
		setContentView(R.layout.activity_main);
		
                WebView myWebView = (WebView) findViewById(R.id.webView1);
                myWebView.loadUrl("http://www.google.com");
	}

}

Experiment 3 – my own file (with puppy graphic )
{it didn’t work because I used “android_assets/html/index.html” instead of final “android_asset/html/index.html”)
put a sample index.html file in assets/html/index.html
add a sample graphic at assets/html/puppy.jpg

public class MainActivity extends Activity {

	@Override
	protected void onCreate(Bundle savedInstanceState) {
		super.onCreate(savedInstanceState);
		setContentView(R.layout.activity_main);
        WebView myWebView = (WebView) findViewById(R.id.webView1);
        myWebView.loadUrl("file:///android_asset/html/index.html");

	}

}
<!doctype html>
<html lang=es>
<head>
<title>Title</title>
</head>
<body>
<h1>Hey there</h1>
<div>
  <img src="file:///android_asset/html/puppy.jpg">
</div>
<div>
The time is 
<span id="time">Time</span>
</div>
</body>
</html>

So then I got bold – CSS and jQuery!
1. Add the css file
2. add the jquery.min.js file
3. Change mainactivity to allow javascript run

public class MainActivity extends Activity {

	@Override
	protected void onCreate(Bundle savedInstanceState) {
		super.onCreate(savedInstanceState);
		setContentView(R.layout.activity_main);

		WebView myWebView = (WebView) findViewById(R.id.webView1);
        WebSettings websettings=myWebView.getSettings();
        websettings.setJavaScriptEnabled(true);
        myWebView.loadUrl("file:///android_asset/html/index.html");

	}

}
html {
   background-color: #aa2020;
}
h1 { 
   color: #0000ff;
}
img { 
 width: 90%;
 margin: auto;
}
<!doctype html>
<html lang=en>
<head>
<title>Title</title>
<link rel="stylesheet" type="text/css" href="main.css" />
<script src="jquery-2.0.3.min.js"></script>
<script type="text/javascript">
var counter=0;
$( document ).ready(function() { 
    setInterval(tick,1000);
});
function tick(){
	counter++;
    $( "#time" ).text(counter);
}
</script>
</head>
<body>
<h1>Hey there</h1>
<div>
Elapsed Seconds: 
<span id="time">???</span>
</div>
<div>
  <img src="file:///android_asset/html/puppy.jpg">
</div>
</body>
</html>

Extra special awesomeness part 1 – Dynamic graph demo
create the graph.html file (cut and paste from the example)
include Flot and jquery and rember to
include flot’s example.css too so it will show up
Remove the relative links from the example html

Now the fun begins – combine the two
1. Create an interface in the main activity and attache it using the addJavascriptInterface call
2. Add references to that object in the javascript
note: save time by changing manifest versions to max at 16 not 17(where it needs a special annotation syntax)

public class MainActivity extends Activity {
	Random random=new Random();
	
	@Override
	protected void onCreate(Bundle savedInstanceState) {
		super.onCreate(savedInstanceState);
		setContentView(R.layout.activity_main);

		WebView myWebView = (WebView) findViewById(R.id.webView1);
        WebSettings websettings=myWebView.getSettings();
        websettings.setJavaScriptEnabled(true);
        myWebView.addJavascriptInterface(new JavaScriptInterface(this), "MyAndroid");
        myWebView.loadUrl("file:///android_asset/html/index.html");

	}
    public class JavaScriptInterface {
        Context mContext;
 
        /** Instantiate the interface and set the context */
        JavaScriptInterface(Context c) {
            mContext = c;
        }
 
        /** Show a toast from the web page */
        public String showToast(String toast) {
            Toast.makeText(mContext, toast, Toast.LENGTH_SHORT).show();
            return toast;
        }
 
        public int randomInt(){
            return random.nextInt(100);
        }
    }

}
<!doctype html>
<html lang=en>
<head>
<title>Title</title>
<link rel="stylesheet" type="text/css" href="main.css" />
<script src="jquery-2.0.3.min.js"></script>
<script type="text/javascript">
var counter=0;
$( document ).ready(function() { 
    setInterval(tick,1000);
});
function tick(){
var result=MyAndroid.randomInt();
	counter++;
    $( "#time" ).text(counter);
    $("#time2").text(" uh "+result);
}
</script>
</head>
<body>
<h1>Hey there</h1>
<div>
Elapsed Seconds: 
<span id="time">???</span>
<span id="time2">???</span>
</div>
<div>
<a href="testgraph.html">Test Grapht</a>
</div>
<div>
  <img src="file:///android_asset/html/puppy.jpg">
</div>
</body>
</html>

NOW TIE IT ALL TOGHETHER


public class MainActivity extends Activity {
	Random random=new Random();
	int lastRandom=50;
	@Override
	protected void onCreate(Bundle savedInstanceState) {
		super.onCreate(savedInstanceState);
		setContentView(R.layout.activity_main);

		WebView myWebView = (WebView) findViewById(R.id.webView1);
        WebSettings websettings=myWebView.getSettings();
        websettings.setJavaScriptEnabled(true);
        myWebView.addJavascriptInterface(new JavaScriptInterface(this), "MyAndroid");
        myWebView.loadUrl("file:///android_asset/html/index.html");

	}
    public class JavaScriptInterface {
        Context mContext;
 
        /** Instantiate the interface and set the context */
        JavaScriptInterface(Context c) {
            mContext = c;
        }
 
        /** Show a toast from the web page */
        public String showToast(String toast) {
            Toast.makeText(mContext, toast, Toast.LENGTH_SHORT).show();
            return toast;
        }
 
        public int randomInt(){
        	lastRandom+=random.nextInt(5)-2;
            return lastRandom;
        }
    }

}

<!doctype html>
<html lang=en>
<head>
	<meta http-equiv="Content-Type" content="text/html; charset=utf-8">
	<title>Flot Examples: Real-time updates</title>
	<link href="examples.css" rel="stylesheet" type="text/css">
	<script language="javascript" type="text/javascript" src="jquery-2.0.3.min.js"></script>
	<script language="javascript" type="text/javascript" src="jquery.flot.min.js"></script>
	<script type="text/javascript">
	$(function() {

		// We use an inline data source in the example, usually data would
		// be fetched from a server

		var data = [],
			totalPoints = 300;

		function getRandomData() {
			if (data.length > 0)
				data = data.slice(1);

			// Do a random walk

			while (data.length < totalPoints) {
				data.push(MyAndroid.randomInt());
			}

			// Zip the generated y values with the x values
			var res = [];
			for (var i = 0; i < data.length; ++i) {
				res.push([i, data[i]])
			}

			return res;
		}

		// Set up the control widget

		var updateInterval = 500;
		$("#updateInterval").val(updateInterval).change(function () {
			var v = $(this).val();
			if (v && !isNaN(+v)) {
				updateInterval = +v;
				if (updateInterval < 1) {
					updateInterval = 1;
				} else if (updateInterval > 2000) {
					updateInterval = 2000;
				}
				$(this).val("" + updateInterval);
			}
		});

		var plot = $.plot("#placeholder", [ getRandomData() ], {
			series: {
				shadowSize: 0	// Drawing is faster without shadows
			},
			yaxis: {
				min: 0,
				max: 100
			},
			xaxis: {
				show: false
			}
		});

		function update() {

			plot.setData([getRandomData()]);

			// Since the axes don't change, we don't need to call plot.setupGrid()

			plot.draw();
			setTimeout(update, updateInterval);
		}

		update();

		// Add the Flot version string to the footer

		$("#footer").prepend("Flot " + $.plot.version + " – ");
	});

	</script>
</head>
<body>

	<div id="header">
		<h2>Real-time updates</h2>
	</div>

	<div id="content">

		<div class="demo-container">
			<div id="placeholder" class="demo-placeholder"></div>
		</div>

		<p>You can update a chart periodically to get a real-time effect by using a timer to insert the new data in the plot and redraw it.</p>

		<p>Time between updates: <input id="updateInterval" type="text" value="" style="text-align: right; width:5em"> milliseconds</p>

	</div>

	<div id="footer">
		Copyright © 2007 - 2013 IOLA and Ole Laursen
	</div>

</body>
</html>

HEE HEE. Not a bad afternoons expermimentation. Now to combine it with the Bluetooth Experiments of early October and a nifty bit of hardware called HH ODB Advanced – to use CAN Open to read realtime information.
Stay Tuned.

CakePHP

First Glimpse

Yes, it is a very pretty website.  Sure, you could put together a blog in about 5 minutes.   But now you’ve committed to start using this framework called CakePHP and all bets are off.  The tutorials are not complete.  The code doesn’t always work as expected.   The documentation available on the web is sketchy at best, and professional books on the subject are out of date and

Useful Stuff

Following in the footsteps of all modern web platforms, they have rolled their own Model View Controller (MVC) and it looks a lot like what I’ve seen with Joomla and Drupal.  The docs say this is were thing go –

  1. Model – All the important stuff including database access.  After all, it IS the model – a live simulation of the application.
  2. View – Take that model stuff and put it into the appropriate format.
  3. Controller – act as the traffic cop by allowing certain types of actions on the model in question.

What makes it fun:  CRUD [ Create, Read, Update and Delete] in a few minutes.  Scaffolding, roll your own backoffice in seconds by declaring One-to-many/many to one relationships to match your database.

Silly Conventions – Naming Schemes

Module Case Filename Sample
Database Plural Posts
Controller PLural /app/Controller/PostsController.php PostsController
Model Singular /app/Model/Post.php Post
View Plural /app/View/Posts/add add.ctp

Running a thread in an activity

But first – why? I did it because I wanted to issue a quickie without setting up a service. Some folks on the
internet say to use asyncTask first.

0. Create a way for the running thread to talk with the outside world via messages
1. The class that implements runnable – it is the thing that does the work
2. An instance of thread that has #1’s runnable with it
3. A way for the runnable to communicate with the application
4. Special bonus – shutdown, and restart

In this instance, we will make a runner that ticks the seconds since
the app starts/ends(hooked to the onResume, onPause functions)

0. Create a way for the running thread to talk with the outside world via messages
At the top of the activity declare some message type codes

		public static final int MSG_SEC_INT = 1;

Then the messaage handler inline…

   // The Handler that gets information back from the Socket
        private final Handler mHandler = new Handler() {
        	@Override
        	public void handleMessage(Message msg) {
        		switch (msg.what) {
        			case MSG_SEC_INT:
                                        int ct=msg.arg1;
                                        Log.i(TAG, "Message CT: "+ct);
        				break;
        		}
        	}
        };

1. The class that implements runnable – this is the thing that does the work. Note the graceful exit from the run loop using the isDone variable(only changed in cancel())

        private class TickTick implements Runnable {
                 long count;
                 int isDone;
        	 public TickTick() {
                      count=0;
                      isDone=0;
        	 }

        	 public void run() {

        	        // do this until an exception occurs
        	 	while (isDone==0) {
                              try {
                                  Thread.sleep(1000);
                                  count++;
	 			    mHandler.obtainMessage(MSG_SEC_INT, count,0); // return two generic ints, our count and nothing important(0).  Can be more elaborate like objects, etc see android documentation.
       	 			    .sendToTarget();
                              }catch(InterruptedException iEx){
                                    isDone=1;
                              }
        	 	}
        	 }

        	 /* Call this from the main activity to shutdown the connection */
        	 public void cancel() {
        		 try {
                               // yeah, this is silly for try-catch but you know its useful for io operations,etc.
                               isDone=1;
        		 } 
        		 catch (IOException e) { 
        			 Log.e(TAG, "Error when closing the TickTick");
        		 }
        	 }
        } /* end runnable */

3. A way for the runnable to communicate with the application

// global declaration
         TickTick runner=null;
         Thread tickThread=null;

And in the activities start routine. Good candidates are onStart,onCreate, onResume. I chose onResume.

      runner=new TickTick();
      tickThread=new Thread(runner;
      tickThread.start();  // 

4. Special bonus for shutdown
best place for this is onPause, onStop, onDestroy – we use on Destroy

public void onPause(){
/* // use me to interrupt the thread without waiting for nice clean shutdown
      if(tickThread!=null){
           thread.interrupt();
      }
*/
      runner.cancel(); // use cancel to give the thread a chance to die naturally
      thread.join(5000);  // and give it 5 seconds to try
      super.onPause();
}

Basic Graphics Stuff

Load image from URL and paste it into your own bitmap

  • Load Image from URL
  • Convert Image to BASE64 – easy storage on sqlite database
  • Convert image to something that can be drawn
    • Of course this is just a toy since converting to base64 and back is silly

      public static Bitmap getBitmapFromURL(String src) {
      	Bitmap ret=null;
          try {
              URL url = new URL(src);
              HttpURLConnection connection = (HttpURLConnection) url.openConnection();
              connection.setDoInput(true);
              connection.connect();
      // get the image
              InputStream input = connection.getInputStream();
      // convert it into byte[] in prep of convert to base64
              byte[] rawimage=readBytes(input); 
      // convert to base64 string
              String x64=Base64.encodeToString(rawimage, Base64.DEFAULT);
      // convert back from base64 
              byte[] ext=Base64.decode(x64, Base64.DEFAULT);
      // render the byte array as a bitmap
              ret = BitmapFactory.decodeByteArray(ext, 0, ext.length);
          } catch (IOException e) {
              e.printStackTrace();
          }
          return ret;
      }
      
      public void paint() throws Exception{
      	   Canvas c = new Canvas(bitmap);
      	   Paint p=new Paint(Color.BLACK);
      	   c.drawColor(Color.WHITE);
      	   p.setTextSize(80);
      	   c.drawText("HEY",50,50,p);
      	   try {
      			//Bitmap timg=getBitmapFromURL("http://www.uclick.com/puzzles/tmjmf/puzzles/tmjmf130501.gif");
      	   //c.save();
      	   c.scale(3f, 3f, 0, 0);
      	   c.drawBitmap(timg, 200, 100, null);
      	   } catch(Exception e){
      		   e.printStackTrace();   
      	   }
      	   //c.restore();
      	
      }